> ## Documentation Index
> Fetch the complete documentation index at: https://asapp-04-04-getting-started-ga.mintlify.site/llms.txt
> Use this file to discover all available pages before exploring further.
# Test Scenarios
> Learn how to create and use Test Scenarios to test conversations with GenerativeAgent.
A **Test Scenario** is a simulated customer profile created to test conversations with GenerativeAgent.
These scenarios help you define both the mock API responses and the customer's side of the interaction—goals, known information, and personality—so you can assess how GenerativeAgent handles customers with different scenarios, edge cases, and potential issues.
Use Test Scenarios to test:
* Key happy-flows
* Edge cases
* Common problems or issues
There are two ways to use Test Scenarios:
1. **Manual:** 'Talk to GenerativeAgent' mode\
To save and start using a test scenario to 'talk to GenerativeAgent', fill in the **Test Name** and **User API profile**.
2. **Automatic:** 'Simulate a customer and conversation' mode\
To save and start using a test scenario to 'Simulate a customer and conversation', fill in the **Test Name**, **User API profile**, **User Goals**, and **Information the user knows** sections so the customer portion of the conversation can be simulated.
### Create a Test Scenario
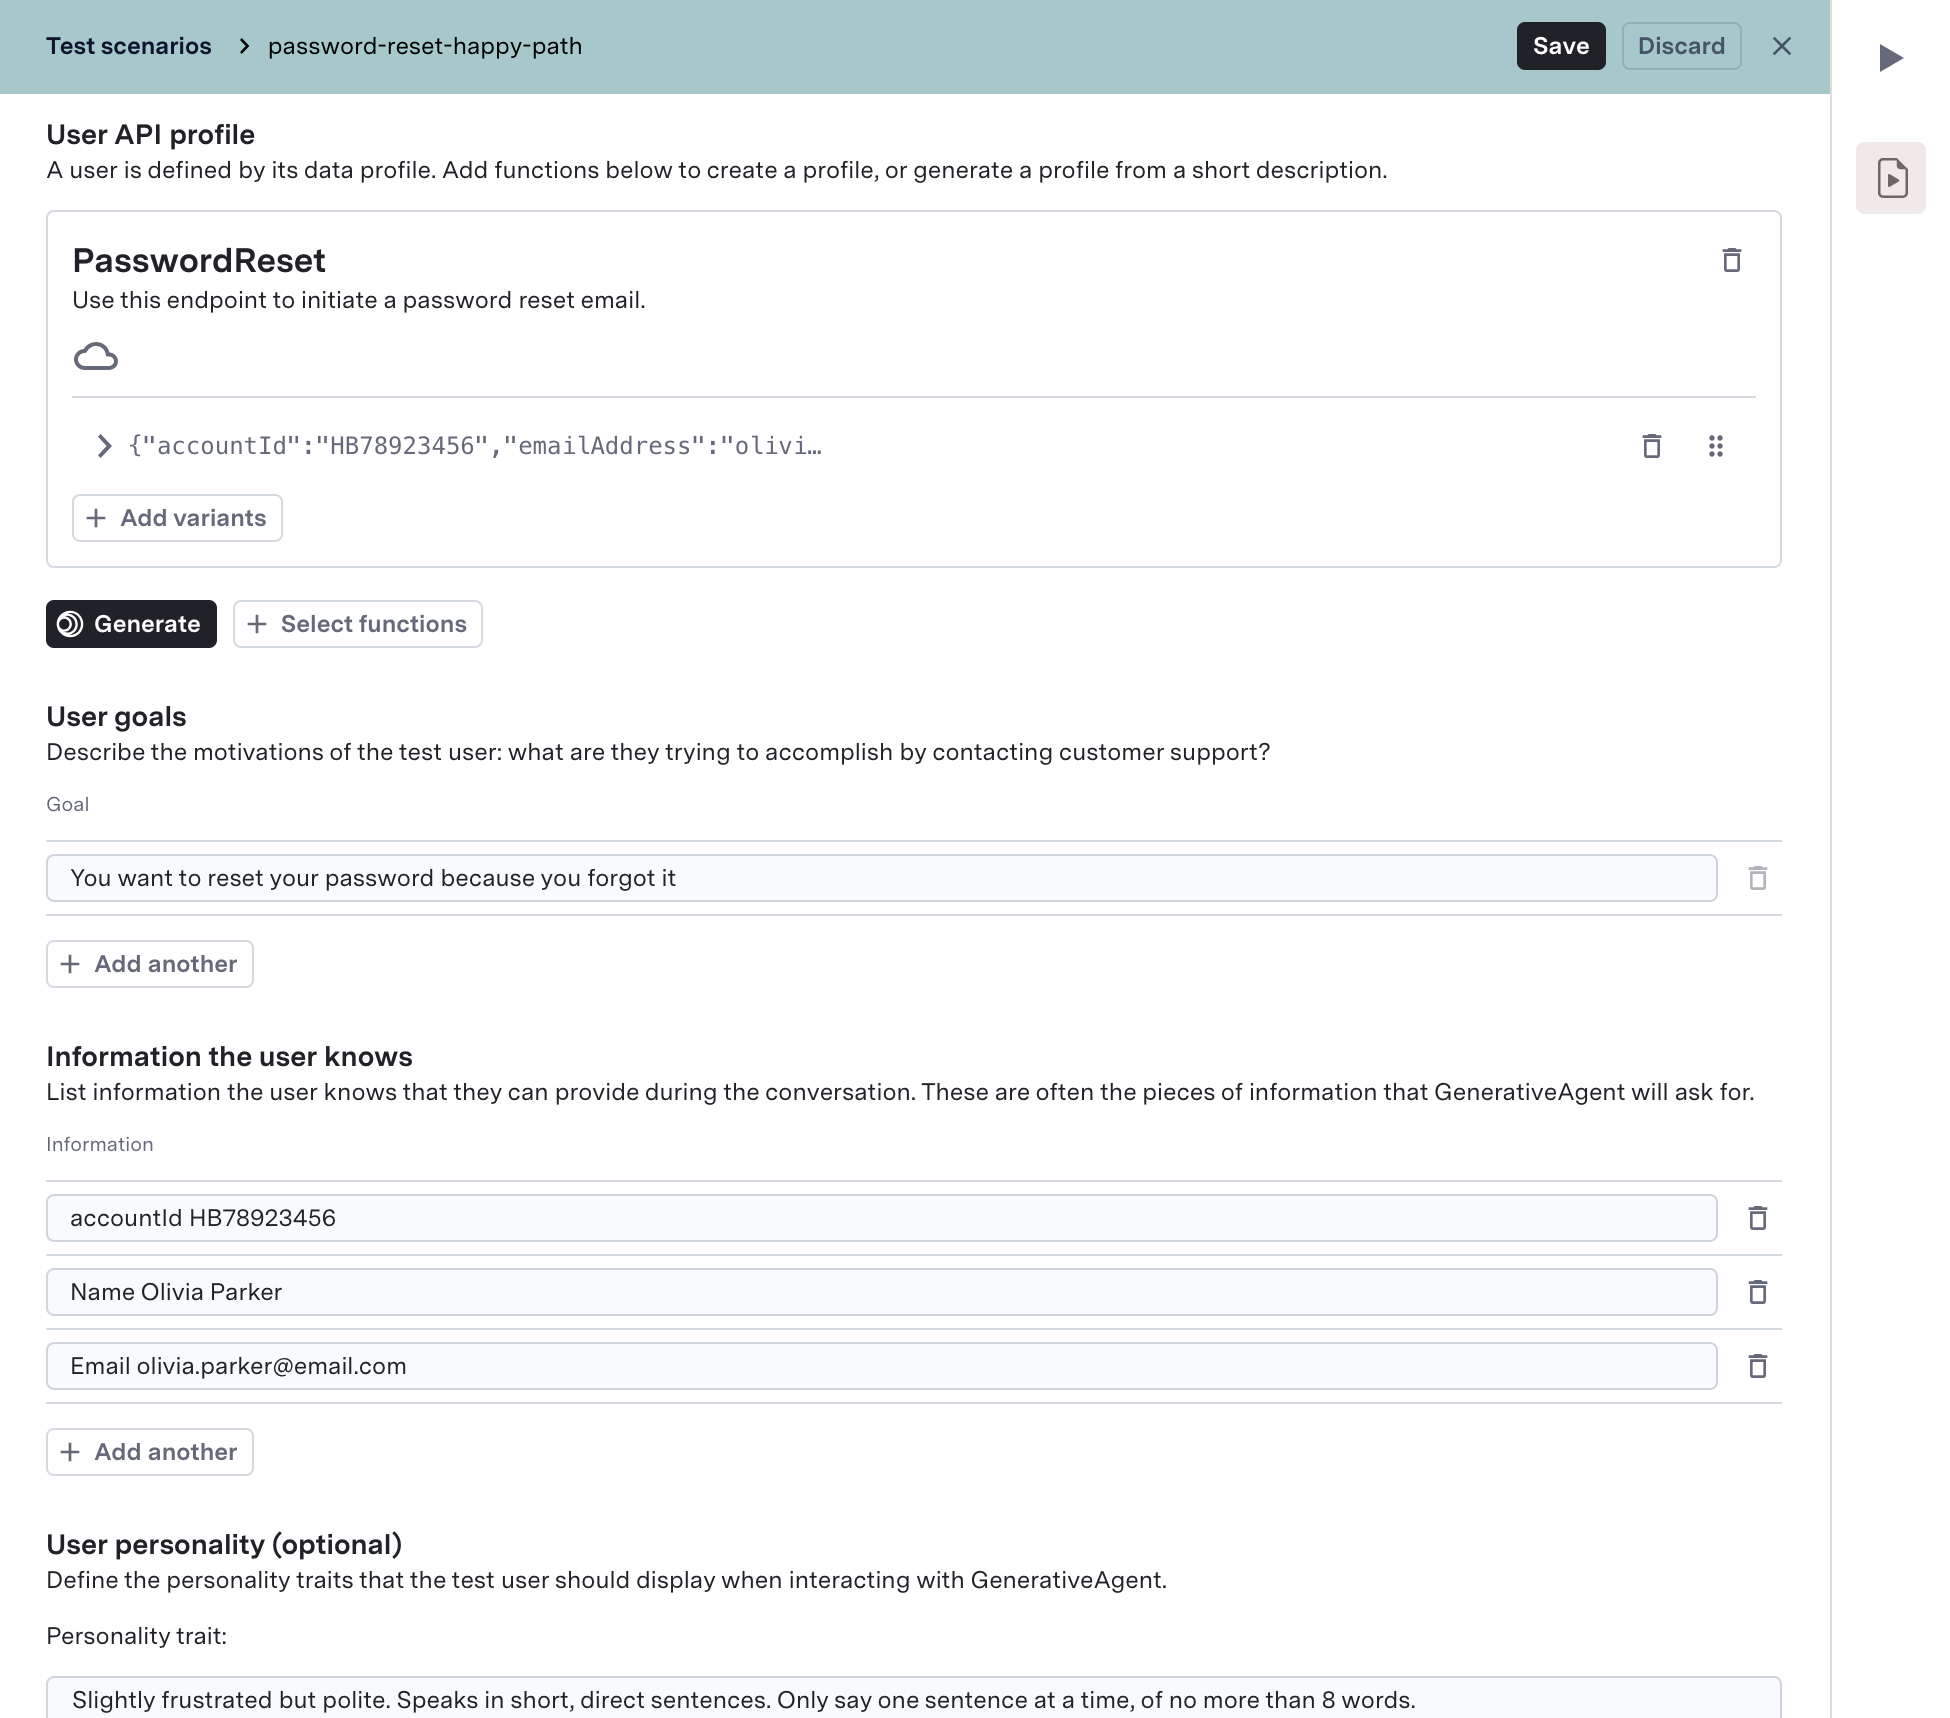 To create a Test Scenario:
Go to the **Test Scenarios** page in GenerativeAgent and click **"Create Scenario"** to begin creating a new test scenario.
Start by providing the essential details that identify and describe your test scenario:
* **Test name**: A clear, descriptive name for your scenario
* **Description**: (Optional) A brief explanation of what you're testing and what you expect to achieve
Set up the [User API Profile](#configure-user-api-profile) to define the mock responses for your test case.
Add optional settings like [Starting Task](#starting-task-optional) or [Input Variables](#input-variables-optional) to define how the test conversation begins.
If you are using the automatic mode, you can configure the customer's behavior and goals by filling in the [Simulation Details](#define-simulation-details) section. Toggle evaluations **on**.
Toggle evaluations **on** and optionally add [Applicability Criteria](#applicability-criteria) and [Evaluation Criteria](#evaluation-criteria) to assess the conversation outcomes.
After completing these steps, save your Test Scenario and [start running it](#run-a-test-scenario) in either manual or automatic simulation mode.
You can now preview the test scenario directly from the test file **after saving** your changes.
## Configure User API Profile
The data that GenerativeAgent uses is critical to how it behaves. The User API Profile defines the mock data that will be given to GenerativeAgent when using this test scenario.
You have two options to mock data:
1. [Auto-generate mock data](#auto-generate-mock-data).
2. [Manually define functions](#manually-define-functions)
### Auto-generate mock data
Auto-generate mock data will create function mocks using the scenario you describe and the schema of the functions in the main branch of the draft environment.
To auto-generate mock data:
1. Click **Generate**.
2. Describe your scenario in a few sentences.
3. Wait up to one minute for the profile to be created (you can close the dialog while you wait).
Mocked data schemas will be pulled from the main branch of the draft environment. To test a new function, it needs to have been added to the main branch of the draft environment.
Adding details about what information the customer will have to share with GenerativeAgent and what GenerativeAgent will have to do will significantly improve the ability to auto-mock the appropriate APIs.
### Manually define functions
If you know the specific data you want to mock for scenario, you can manually define the functions and mock data.
1. Click **+ Select functions**.
2. Choose the API calls you want to mock (e.g. `getAccountInfo`, `confirmCode`).
3. For each function, provide the mocked **request** and **response** in JSON.
#### Add variants to mocked data
To simulate different API responses under the same function:
1. Click **+ Add variants** at the bottom of a function.
2. Define alternative request parameters and corresponding response schema.
3. Save to include the variant in your scenario.
To create a Test Scenario:
Go to the **Test Scenarios** page in GenerativeAgent and click **"Create Scenario"** to begin creating a new test scenario.
Start by providing the essential details that identify and describe your test scenario:
* **Test name**: A clear, descriptive name for your scenario
* **Description**: (Optional) A brief explanation of what you're testing and what you expect to achieve
Set up the [User API Profile](#configure-user-api-profile) to define the mock responses for your test case.
Add optional settings like [Starting Task](#starting-task-optional) or [Input Variables](#input-variables-optional) to define how the test conversation begins.
If you are using the automatic mode, you can configure the customer's behavior and goals by filling in the [Simulation Details](#define-simulation-details) section. Toggle evaluations **on**.
Toggle evaluations **on** and optionally add [Applicability Criteria](#applicability-criteria) and [Evaluation Criteria](#evaluation-criteria) to assess the conversation outcomes.
After completing these steps, save your Test Scenario and [start running it](#run-a-test-scenario) in either manual or automatic simulation mode.
You can now preview the test scenario directly from the test file **after saving** your changes.
## Configure User API Profile
The data that GenerativeAgent uses is critical to how it behaves. The User API Profile defines the mock data that will be given to GenerativeAgent when using this test scenario.
You have two options to mock data:
1. [Auto-generate mock data](#auto-generate-mock-data).
2. [Manually define functions](#manually-define-functions)
### Auto-generate mock data
Auto-generate mock data will create function mocks using the scenario you describe and the schema of the functions in the main branch of the draft environment.
To auto-generate mock data:
1. Click **Generate**.
2. Describe your scenario in a few sentences.
3. Wait up to one minute for the profile to be created (you can close the dialog while you wait).
Mocked data schemas will be pulled from the main branch of the draft environment. To test a new function, it needs to have been added to the main branch of the draft environment.
Adding details about what information the customer will have to share with GenerativeAgent and what GenerativeAgent will have to do will significantly improve the ability to auto-mock the appropriate APIs.
### Manually define functions
If you know the specific data you want to mock for scenario, you can manually define the functions and mock data.
1. Click **+ Select functions**.
2. Choose the API calls you want to mock (e.g. `getAccountInfo`, `confirmCode`).
3. For each function, provide the mocked **request** and **response** in JSON.
#### Add variants to mocked data
To simulate different API responses under the same function:
1. Click **+ Add variants** at the bottom of a function.
2. Define alternative request parameters and corresponding response schema.
3. Save to include the variant in your scenario.
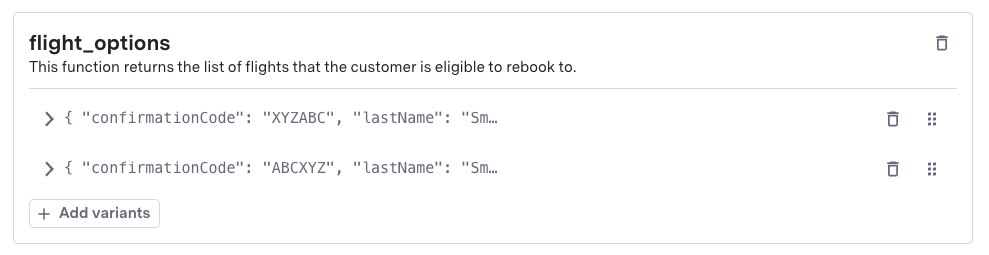 ### Updating Mock data
It is not uncommon to need to update the mock data after creating a Test Scenario. After creating a Test Scenario, ensure your mock data aligns with your testing needs.
This can be done by updating your scenario when auto-generating the mock data or manually adding the functions and mock data.
### Date & time override (optional)
Often APIs have an implicit or explicit date and time they are being performed. By default, GenerativeAgent will assume the customer interaction is happening at the date and time the scenario is ran and update timestamp in the API profile accordingly.
You can override the assumed timestamp of the interaction.
## Set Input Context
The **Input Context** defines the initial data and configuration that your system provides to GenerativeAgent when a conversation begins. This ensures your test scenarios accurately simulate real-world interactions.
The input context consists of two main components:
1. **[Input Variables](/generativeagent/configuring/tasks-and-functions/input-variables)**: JSON data that provides context about the customer, conversation, or session
2. **[Starting Task](/generativeagent/configuring/tasks-and-functions/enter-specific-task)**: The specific task or flow that GenerativeAgent should begin with
Ensure your input context matches exactly how your production system passes data to GenerativeAgent. This guarantees your test scenarios will behave identically to real conversations.
## Define Simulation Details
When you are using the automatic mode, you need to define how the simulated customer will behave. Describe what the simulated customer brings to the conversation.
These fields drive the customer's interactions with GenerativeAgent
* The [User Goals](#user-goals).
* The [Information the user knows](#information-the-user-knows).
* The [User personality](#user-personality-optional).
Additionally you can set the **max number of turns** the simulation can run. By default, it is set to **15** turns.
### User goals
Describe the motivations of the simulated customer (e.g. "You want to change your billing address", "You want a refund").
The customer will attempt each goal in sequence; if it fails, it may escalate or skip.
### Information the user knows
List identity or account data the customer can provide (e.g. Name, address, confirmation code, account number). The customer will relay this information when prompted; omit some to simulate forgotten details.
To test how GenerativeAgent will handle a customer who *does not* have their account number or a critical piece of information, just leave it off the list.
### User personality (optional)
Define the tone and style for your simulated customer (rude, insistent, confused, etc.).\
By default:
> Slightly frustrated but polite. Speaks in short, direct sentences. Only say one sentence at a time, of no more than 8 words.
Click **Revert to default personality** to restore.
## Add Evaluations
When evaluations are toggled **on**, the system will run evaluation logic after the conversation ends.
### Applicability Criteria (optional)
Define preconditions or milestones that must be met in the conversation for the evaluation to run. This is useful to disqualify cases where the conversation didn't reach the part you're testing.
If left **blank**, the evaluation **will run by default**.
Example:
> "Customer asked for their bill amount"
### Evaluation Criteria
Define one or more evaluation checks to apply to the conversation.
Examples:
> "The Agent provided the current month's bill amount of \$144.72"
> "The Agent did NOT offer a discount"
Evaluation results will appear in the **Previewer**, side-by-side with the conversation after clicking on the **Results** button.
If you update your evaluation or applicability criteria later, you can return to the same conversation in the Previewer and click **Run Eval Again** to re-run against the updated test.
## Run a Test Scenario
Test scenarios are run in the **Previewer** on the side-panel.
To run a Test Scenario:
1. Navigate to the **Previewer** (play-button) on the side-panel.
2. Click **Simulate a customer and conversation**.
3. Select your test scenario from the dropdown.
4. Optionally:
* Override the starting task by selecting one from the dropdown.
* Override input variables by pasting JSON into the field.
5. Click **Start Conversation** to begin the test.
### Updating Mock data
It is not uncommon to need to update the mock data after creating a Test Scenario. After creating a Test Scenario, ensure your mock data aligns with your testing needs.
This can be done by updating your scenario when auto-generating the mock data or manually adding the functions and mock data.
### Date & time override (optional)
Often APIs have an implicit or explicit date and time they are being performed. By default, GenerativeAgent will assume the customer interaction is happening at the date and time the scenario is ran and update timestamp in the API profile accordingly.
You can override the assumed timestamp of the interaction.
## Set Input Context
The **Input Context** defines the initial data and configuration that your system provides to GenerativeAgent when a conversation begins. This ensures your test scenarios accurately simulate real-world interactions.
The input context consists of two main components:
1. **[Input Variables](/generativeagent/configuring/tasks-and-functions/input-variables)**: JSON data that provides context about the customer, conversation, or session
2. **[Starting Task](/generativeagent/configuring/tasks-and-functions/enter-specific-task)**: The specific task or flow that GenerativeAgent should begin with
Ensure your input context matches exactly how your production system passes data to GenerativeAgent. This guarantees your test scenarios will behave identically to real conversations.
## Define Simulation Details
When you are using the automatic mode, you need to define how the simulated customer will behave. Describe what the simulated customer brings to the conversation.
These fields drive the customer's interactions with GenerativeAgent
* The [User Goals](#user-goals).
* The [Information the user knows](#information-the-user-knows).
* The [User personality](#user-personality-optional).
Additionally you can set the **max number of turns** the simulation can run. By default, it is set to **15** turns.
### User goals
Describe the motivations of the simulated customer (e.g. "You want to change your billing address", "You want a refund").
The customer will attempt each goal in sequence; if it fails, it may escalate or skip.
### Information the user knows
List identity or account data the customer can provide (e.g. Name, address, confirmation code, account number). The customer will relay this information when prompted; omit some to simulate forgotten details.
To test how GenerativeAgent will handle a customer who *does not* have their account number or a critical piece of information, just leave it off the list.
### User personality (optional)
Define the tone and style for your simulated customer (rude, insistent, confused, etc.).\
By default:
> Slightly frustrated but polite. Speaks in short, direct sentences. Only say one sentence at a time, of no more than 8 words.
Click **Revert to default personality** to restore.
## Add Evaluations
When evaluations are toggled **on**, the system will run evaluation logic after the conversation ends.
### Applicability Criteria (optional)
Define preconditions or milestones that must be met in the conversation for the evaluation to run. This is useful to disqualify cases where the conversation didn't reach the part you're testing.
If left **blank**, the evaluation **will run by default**.
Example:
> "Customer asked for their bill amount"
### Evaluation Criteria
Define one or more evaluation checks to apply to the conversation.
Examples:
> "The Agent provided the current month's bill amount of \$144.72"
> "The Agent did NOT offer a discount"
Evaluation results will appear in the **Previewer**, side-by-side with the conversation after clicking on the **Results** button.
If you update your evaluation or applicability criteria later, you can return to the same conversation in the Previewer and click **Run Eval Again** to re-run against the updated test.
## Run a Test Scenario
Test scenarios are run in the **Previewer** on the side-panel.
To run a Test Scenario:
1. Navigate to the **Previewer** (play-button) on the side-panel.
2. Click **Simulate a customer and conversation**.
3. Select your test scenario from the dropdown.
4. Optionally:
* Override the starting task by selecting one from the dropdown.
* Override input variables by pasting JSON into the field.
5. Click **Start Conversation** to begin the test.
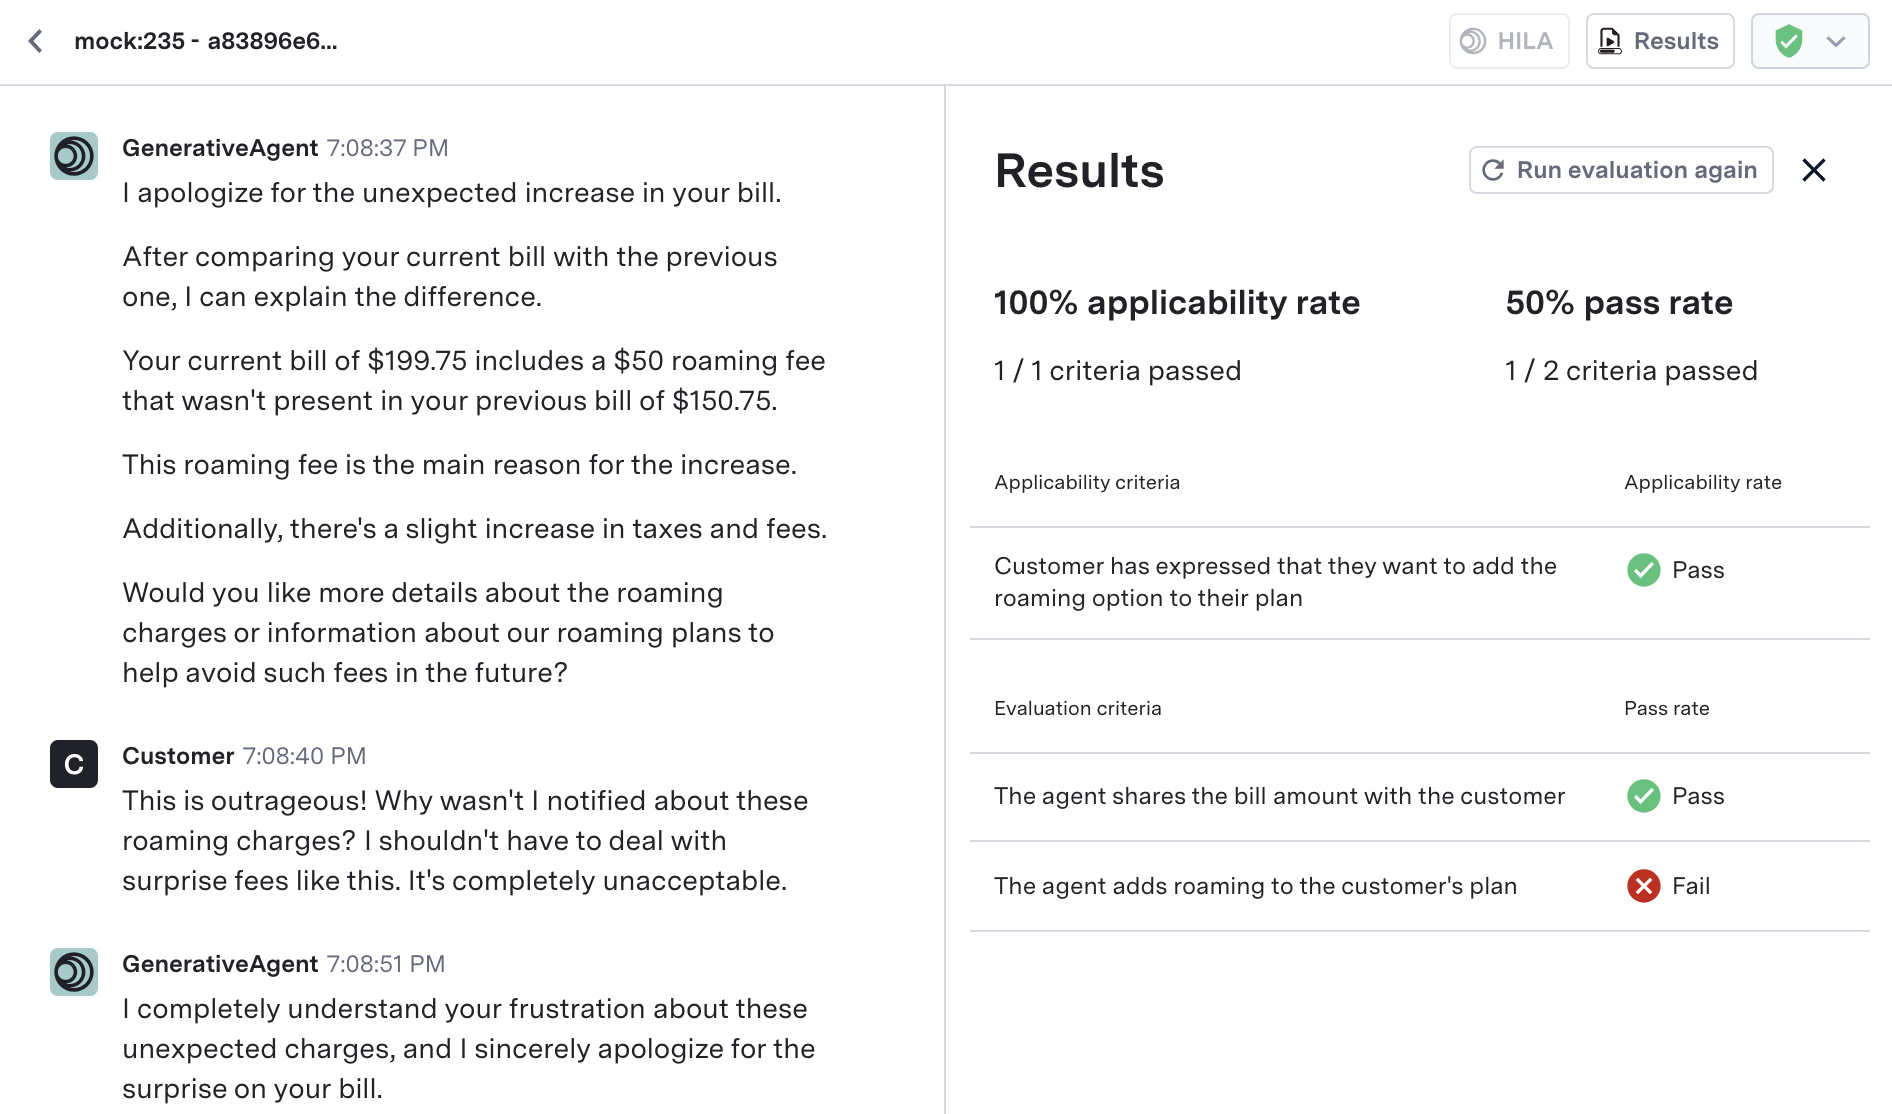 Once the conversation ends:
* Click **Results** to open detailed evaluation outcomes.
* Click **Run Eval Again** to re-run evaluations on the conversation in the previewer.
## Migration of Test Users
All existing Test Users will be migrated to Test Scenarios and retain their functionality:
* Your Test Users become Test Scenarios automatically. You can still talk to GenerativeAgent with your old test users by selecting them in the dropdown in the previewer.
* The original **default** Test User is converted into a **default** Test Scenario—do not delete it unless you no longer need it.
Once the conversation ends:
* Click **Results** to open detailed evaluation outcomes.
* Click **Run Eval Again** to re-run evaluations on the conversation in the previewer.
## Migration of Test Users
All existing Test Users will be migrated to Test Scenarios and retain their functionality:
* Your Test Users become Test Scenarios automatically. You can still talk to GenerativeAgent with your old test users by selecting them in the dropdown in the previewer.
* The original **default** Test User is converted into a **default** Test Scenario—do not delete it unless you no longer need it.