> ## Documentation Index
> Fetch the complete documentation index at: https://asapp-04-04-getting-started-ga.mintlify.site/llms.txt
> Use this file to discover all available pages before exploring further.
# Adding a use case to GenerativeAgent
> Learn how to add new use cases to GenerativeAgent by creating tasks and functions
Adding a use case to GenerativeAgent involves creating a **Task** that represents the business scenario you want your agent to handle, along with the **Functions** that enable it to perform the necessary actions.
Tasks represent use cases - they define what GenerativeAgent can accomplish for your customers. Functions are the tools that enable those tasks by connecting to your backend systems.
## Step 1: Define Your Use Case
Start by clearly defining the business scenario you want GenerativeAgent to handle:
* **Customer goal**: What does the customer want to accomplish?
* **Business context**: What type of issue or request is this?
* **Success criteria**: How do you know when the task is complete?
* **Required actions**: What backend operations are needed?
**Customer goal**: "I want to check where my order is"
**Business context**: Customer service inquiry about order tracking
**Success criteria**: Customer receives current order status and tracking information
**Required actions**: Look up order details, retrieve tracking information, provide status update
**Customer goal**: "I need to book a doctor's appointment"
**Business context**: Healthcare appointment booking
**Success criteria**: Customer has a confirmed appointment with details
**Required actions**: Check availability, book appointment, send confirmation
## Step 2: Create the Task
Navigate to the Tasks page and create a new task that represents your use case:
Go to the Tasks page in your GenerativeAgent configuration.
Click "Create task" to start defining your use case.
Provide the following information:
* **Task name**: Clear, descriptive name for your use case
* **Task selector description**: How GenerativeAgent identifies when to use this task
* **Task message** (optional): Initial response when this task is selected
* **General Instructions**: Detailed guidance on how to handle this use case
* **Functions**: Select the functions this task should use
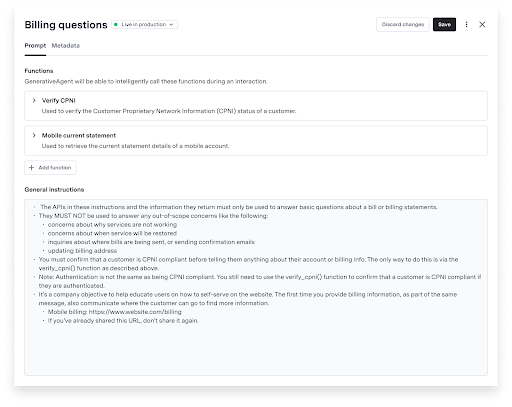 **This is the most critical part of creating a successful use case.** Your task instructions determine how GenerativeAgent behaves and whether it handles your use case correctly.
Effective task instructions should:
* **Be specific and actionable**: Tell GenerativeAgent exactly what to do in each scenario
* **Include examples**: Provide common customer requests and expected responses
* **Plan for edge cases**: Define what to do when things go wrong
* **Set clear boundaries**: Specify when to escalate to human agents
**Need help writing effective instructions?** See our comprehensive guides:
* [Task Best Practices](/generativeagent/configuring/task-best-practices) - Complete guide to writing effective task instructions
* [Improving Tasks](/generativeagent/configuring/tasks-and-functions/improving) - Resources and tools for optimizing task performance
Specify knowledge base metadata to restrict GenerativeAgent to using only articles with matching metadata for this specific use case.
This helps ensure GenerativeAgent uses the most relevant information for each specific use case, improving accuracy and reducing irrelevant responses.
If you followed the [Build your first GenerativeAgent](/generativeagent/getting-started) guide, you already have a Knowledge Base imported.
Otherwise you can [connect your knowledge base](/generativeagent/configuring/connecting-your-knowledge-base) now.
## Step 3: Create Required Functions
Functions enable GenerativeAgent to perform actions similar to a live agent. For each action your use case requires, create the appropriate function.
### Available Function Types
Connect to your existing APIs to fetch data or perform actions. Most common function type for integrating with backend systems.
Define ideal API interactions before connecting to real systems. Perfect for testing and development.
Store conversation data as reference variables for future use. Useful for tracking customer information across the conversation.
Signal that control should be transferred to an external system or end the conversation with relevant data.
### Creating Functions
Go to the Functions page in your GenerativeAgent configuration.
Click "Create Function" to start defining your function.
Provide the following information:
* **Function name**: Clear, descriptive name for the function
* **Description**: How GenerativeAgent should use this function
* **API Connection**: The backend system this function connects to
Select the appropriate function type based on your use case needs:
For functions that need to interact with your live backend systems.
1. Select an existing [API connection](/generativeagent/configuring/connect-apis)
2. Choose the API version if multiple are available
3. Save the function
GenerativeAgent will call the real API during customer interactions.
For testing or when you want to define the ideal API interaction first.
1. Click "Integrate later"
2. Define request parameters in JSON schema format
3. Save the function
You can replace the Mock call with a real API connection at any time.
For storing conversation data as reference variables.
1. Select "Set variable" function type
2. Define the input GenerativeAgent should use
3. Add the variables you want to set
4. Save the function
Useful for tracking customer information across the conversation.
For signaling control transfer or conversation ending.
1. Select "System transfer" function type
2. Define the input GenerativeAgent should use
3. Optionally add variables to pass along
4. Save the function
Helpful for ending conversations or handing control back to external systems.
## Step 4: Connect Functions to Your Task
Once you've created the necessary functions, connect them to your task:
1. Return to your task configuration
2. Select the functions this task should use
3. Ensure the functions align with the actions your use case requires
4. Test the task with the Previewer to verify everything works correctly
## Step 5: Test Your Use Case
Use the [Previewer](/generativeagent/configuring/previewer) tool to test your new use case:
Navigate to the [Previewer](/generativeagent/configuring/previewer) in your GenerativeAgent configuration.
Create test conversations that represent how customers would interact with your use case. Use [Test Scenarios](/generativeagent/configuring/tasks-and-functions/test-scenarios) to define customer profiles and test different edge cases.
Ensure all functions are called correctly and return expected results.
Make adjustments to task instructions or function configurations based on test results.
## Next Steps
Use the Previewer to test your new use case with realistic scenarios.
Learn how to connect your knowledge base for better context and responses.
Explore integration options for connecting GenerativeAgent to your existing systems.
Learn how to deploy your configured GenerativeAgent to production.
**This is the most critical part of creating a successful use case.** Your task instructions determine how GenerativeAgent behaves and whether it handles your use case correctly.
Effective task instructions should:
* **Be specific and actionable**: Tell GenerativeAgent exactly what to do in each scenario
* **Include examples**: Provide common customer requests and expected responses
* **Plan for edge cases**: Define what to do when things go wrong
* **Set clear boundaries**: Specify when to escalate to human agents
**Need help writing effective instructions?** See our comprehensive guides:
* [Task Best Practices](/generativeagent/configuring/task-best-practices) - Complete guide to writing effective task instructions
* [Improving Tasks](/generativeagent/configuring/tasks-and-functions/improving) - Resources and tools for optimizing task performance
Specify knowledge base metadata to restrict GenerativeAgent to using only articles with matching metadata for this specific use case.
This helps ensure GenerativeAgent uses the most relevant information for each specific use case, improving accuracy and reducing irrelevant responses.
If you followed the [Build your first GenerativeAgent](/generativeagent/getting-started) guide, you already have a Knowledge Base imported.
Otherwise you can [connect your knowledge base](/generativeagent/configuring/connecting-your-knowledge-base) now.
## Step 3: Create Required Functions
Functions enable GenerativeAgent to perform actions similar to a live agent. For each action your use case requires, create the appropriate function.
### Available Function Types
Connect to your existing APIs to fetch data or perform actions. Most common function type for integrating with backend systems.
Define ideal API interactions before connecting to real systems. Perfect for testing and development.
Store conversation data as reference variables for future use. Useful for tracking customer information across the conversation.
Signal that control should be transferred to an external system or end the conversation with relevant data.
### Creating Functions
Go to the Functions page in your GenerativeAgent configuration.
Click "Create Function" to start defining your function.
Provide the following information:
* **Function name**: Clear, descriptive name for the function
* **Description**: How GenerativeAgent should use this function
* **API Connection**: The backend system this function connects to
Select the appropriate function type based on your use case needs:
For functions that need to interact with your live backend systems.
1. Select an existing [API connection](/generativeagent/configuring/connect-apis)
2. Choose the API version if multiple are available
3. Save the function
GenerativeAgent will call the real API during customer interactions.
For testing or when you want to define the ideal API interaction first.
1. Click "Integrate later"
2. Define request parameters in JSON schema format
3. Save the function
You can replace the Mock call with a real API connection at any time.
For storing conversation data as reference variables.
1. Select "Set variable" function type
2. Define the input GenerativeAgent should use
3. Add the variables you want to set
4. Save the function
Useful for tracking customer information across the conversation.
For signaling control transfer or conversation ending.
1. Select "System transfer" function type
2. Define the input GenerativeAgent should use
3. Optionally add variables to pass along
4. Save the function
Helpful for ending conversations or handing control back to external systems.
## Step 4: Connect Functions to Your Task
Once you've created the necessary functions, connect them to your task:
1. Return to your task configuration
2. Select the functions this task should use
3. Ensure the functions align with the actions your use case requires
4. Test the task with the Previewer to verify everything works correctly
## Step 5: Test Your Use Case
Use the [Previewer](/generativeagent/configuring/previewer) tool to test your new use case:
Navigate to the [Previewer](/generativeagent/configuring/previewer) in your GenerativeAgent configuration.
Create test conversations that represent how customers would interact with your use case. Use [Test Scenarios](/generativeagent/configuring/tasks-and-functions/test-scenarios) to define customer profiles and test different edge cases.
Ensure all functions are called correctly and return expected results.
Make adjustments to task instructions or function configurations based on test results.
## Next Steps
Use the Previewer to test your new use case with realistic scenarios.
Learn how to connect your knowledge base for better context and responses.
Explore integration options for connecting GenerativeAgent to your existing systems.
Learn how to deploy your configured GenerativeAgent to production.